BulkEmailSetup Docs
HomepageHow it works?DemoPricingContact Us
Cloud App
Cloud App
  • Welcome to BulkEmailSetup
  • Getting Started
    • Quickstart
  • Popular topics
    • Contacts
      • Contact List
      • Contact or Subscriber
      • Import Contacts
      • Export Contacts
      • Search Contacts
      • Segment
      • Custom Fields
      • Pages
      • Forms
      • Tools
      • Blacklist
    • Campaigns
      • Email Campaign
      • Send Groups
      • Advanced Recurring
      • Autoresponder
      • Automation
      • Email Scheduling
      • Rotation
    • Templates
      • Email Template
      • Classic Editor
      • Pro Editor
      • Unlayer Editor
      • Unsubscribe Link
      • Personalization
      • Available Tags
      • Gallery
    • Reposts
      • Campaign Reports
      • Open & Click Tracking
      • Bounces
      • Unsubscribed
    • Servers
      • Delivery Server
      • Bounce Server
    • Warm-up
      • Warm-Up Plan
      • Warmup Duration
    • Domains
      • Sending Domains
      • Tracking Domains
    • SenderAI
      • SenderAI - SMTP Creation
      • Cloudflare API Keys
      • Godaddy Nameservers Update
    • Reply
      • Reply Tracker
      • Webmail
    • Email Deliverability
      • Understanding Email Delivery
      • SMTP vs External Delivery Servers
      • Handling Bounces for Microsoft Emails
      • Understanding SPF, DKIM, and DMARC
      • Inbox Placement Challenges for Custom SMTP Servers
    • Common Queries
    • FAQs
      • What is BulkEmailSetup?
      • How BulkEmailSetup Works?
      • Cold Emails
      • Email Data
      • White-Label Solution
      • SMTP Setup Requirements
Powered by GitBook
On this page

Was this helpful?

  1. Popular topics
  2. SenderAI

Godaddy Nameservers Update

Learn how to change your domain nameservers in GoDaddy with our easy-to-follow guide. Update DNS settings and manage your domain efficiently.
PreviousCloudflare API KeysNextReply

Was this helpful?

How to Change Your Domain Nameservers in GoDaddy

To change the nameservers for your domain registered with GoDaddy, follow these steps:

  1. Sign in to your GoDaddy account:

    • Visit the GoDaddy Domain Portfolio and log in with your credentials.

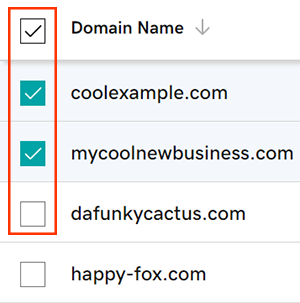
  2. Select the domains to update:

    • In your Domain Portfolio, check the boxes next to the domains you wish to modify. To select all domains, check the box next to "Domain Name" and choose "Select All."

  3. Access the Nameservers settings:

    • Click on the "Nameservers" option in the action menu. If you don't see it immediately, click on the "More" menu and scroll down to find "Nameservers."

  4. Choose your preferred nameserver option:

    • I'll use my own nameservers: Enter your custom nameservers if you prefer to manage DNS elsewhere.

  5. Save your changes:

    • Click "Save," then "Continue" to finalize the updates.

  6. Verify your identity (if prompted):

    • If your domain has Domain Protection enabled, you'll need to verify your identity. If you've had two-step verification (2SV) active for at least 24 hours, enter the code sent via SMS or from your authenticator app. Otherwise, enter the one-time password sent to your registrant email address.

After completing these steps, you'll receive a confirmation indicating that your nameservers have been updated. Please note that DNS changes can take up to 48 hours to propagate globally.

For more detailed information, refer to GoDaddy's official guide:

For a video tutorial, refer to GoDaddy's official guide:

GoDaddy - Edit my domain nameserversGoDaddyHelp
GoDaddy Help Center - How-To Video - How to Change Domain NameserversGoDaddyHelp
Logo
Logo