Email Scheduling
Learn email scheduling. Learn how to plan, automate, and send your campaigns at the right time for maximum engagement and effectiveness.
Introduction
Email scheduling allows you to automate your email campaigns by setting them to trigger at a specific date and time. This feature ensures timely and targeted email delivery.

How to Schedule an Email Campaign
Step 1: Campaign Setup
Create a new campaign or open an existing one.
Step 2: Set Date and Time
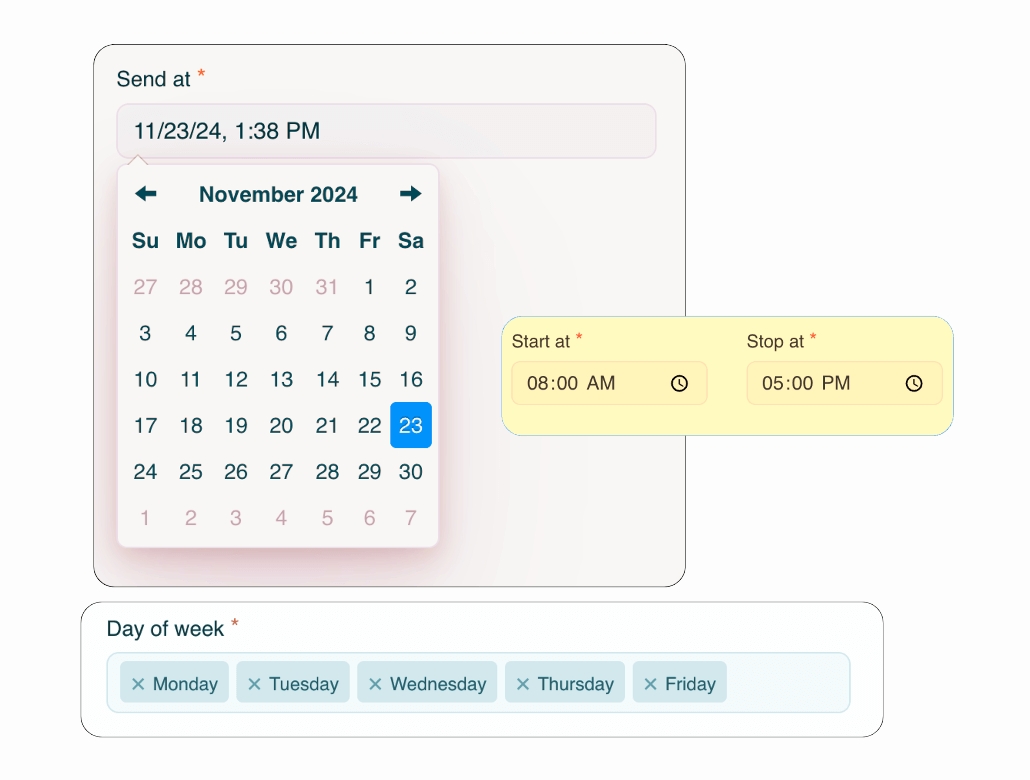
In the confirmation stage, under the Send at field, choose the desired date and time for the campaign to trigger using the calendar and clock options.
Avoid manually entering the date and time in the field. Use the provided picker for accuracy.

Step 3: Select Days of the Week
Use the Days of the Week section to specify the days your campaign should run.
Click on the desired days (e.g., Monday, Tuesday, etc.) to select them. Selected days will appear highlighted.
To remove a day, click on it again.

Step 4: Set Start and Stop Time
Define the active time range for your campaign using the Start at and Stop at fields.
Start at: The time when the campaign will begin sending emails on the selected days.
Stop at: The time when the campaign will stop sending emails on those days.
Both fields use a 12-hour clock format (AM/PM).

Step 5: Save and Confirm
After setting the schedule, save your configuration and confirm the campaign to activate scheduling.
Important Notes:
Ensure your timezone is correctly set in your profile for accurate email delivery timing.
Campaigns will pause outside the specified days and times.
Benefits of Email Scheduling
Automation: Set it once and forget it. our Email App handles the rest.
Time Optimization: Schedule emails to align with recipient time zones or peak engagement hours.
Flexibility: Tailor campaigns for specific days and times to match audience habits.
Consistency: Ensure timely delivery of newsletters, promotions, and announcements.
Example Scheduling Scenarios
Scenario 1: Business Hours Campaign
Send at: November 23, 2024, 1:38 PM
Days of the Week: Monday, Tuesday, Wednesday, Thursday, Friday
Start Time: 8:00 AM
Stop Time: 6:00 PM
This configuration ensures emails are sent only during regular business hours on weekdays.
Scenario 2: Weekend Promotion
Send at: November 25, 2024, 9:00 AM
Days of the Week: Saturday, Sunday
Start Time: 9:00 AM
Stop Time: 3:00 PM
Perfect for targeting weekend shoppers or event participants.
Scenario 3: 24/7 Campaign
Send at: November 23, 2024, 12:01 AM
Days of the Week: Monday to Sunday
Start Time: 12:01 AM
Stop Time: 11:59 PM
Ideal for continuous campaigns or global audiences spanning multiple time zones.
Conclusion
The Send at, Days of the Week and Start/End Time features provide unmatched flexibility for scheduling your campaigns. By customizing when your emails are sent, you can ensure they reach your audience at the most impactful times, boosting engagement and improving overall campaign success.
Was this helpful?